Wednesday, 30 November 2011

54mm ruined house

Here is another quick post. One of the November jobs was a 54mm scale European house that would go with First Legion's Napoleonic buildings.
It ended up being very ruined as I designed it to be able to get into all the rooms without taking off any roofs or floors.
The chimney stack is carved out of Daz pronto which give the bricks an old worn look. I paint the bricks and then wash over a coat of buff paint which gets into the mortar lines and once I rub it off it leaves uneven but effective looking mortar.
The tiles were put on individually and made out of plasticard. The wall paper on the ground floor is from a dolls house supplier. I find the splash of colour the wallpaper gives the insides is really eye catching.
The final size of the house is about 14" long, 8 or 9" wide and about 12" high to the tip of the chimney.
The front

Inside detail- lots of space to place figures

A good view of the chimney stack

The rear showing the 'extention'


Chimney stack from inside


54mm Snow scene for Figarti part 2

It is finished. I was able to add the snow to the boards on Monday and then patch it up and add a bit more on Tuesday which leaves the rest of the week to dry off.
I use alot of watered down PVA glue so it does need a good 48 hours to dry.
I photographed the boards outside and there wasn't enough room to place both boards together so I had to photograph them separately. The final shots from the show will have them together full of Figarti figures.
Here are the final results:


Saturday, 26 November 2011

54mm snow scene for Figarti

The London Toy Soldier show is fast approaching and the 54mm snow scene is taking shape about as quickly as I had expected.
The display is a 4ft x 2ft diorama for Clive at grey Goose who is the European distributor for Figarti. The layout is designed to display their new winter vehicles- Tiger tanks and artillery and limber I think- Clive has the details I am sure.
If you read my November plans post then you will have seen the plan but just as a reminder here it is again-
I think the idea is to have the limbered artillery along the road and the tanks in the fields behind. The whole scene is to be snowy and wintry. I want to make the fields covered with fresh untouched snow except for the tracks of the tanks whereas the road will be churned up full of ice, snow and mud.
I began a couple of weeks ago with the base boards, cutting the ditch out of the polystyrene and adding a couple of small bumps in the fields that will look something like soft dunes when finished.
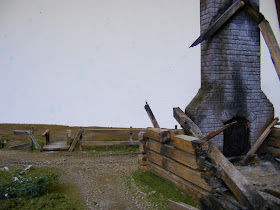
You can see from the plan that there is a ruined wooden house in the bottom right corner. I wanted it to have a stone chimney that stood up while all around was destruction so I started making that with a frame of foam board covered in Das Pronto clay and then carved to look like stone.
As soon as that was done I stuck it to the board for no better reason than I wanted to see it in place. I then added logs that I had roughly squared up. I ended up being a bit short of space so had to use the chimney as a house corner as you can see in the photo.Over the next couple of days I added the texture to the road by coating it with grout mixed with some builders caulk (I buy it is tubes from B and Q and I use it for all sorts of things- a very useful general purpose bit of kit). I then ran a plastic wheel along the road which left lots of tracks in it- a good base for a snowy, muddy road.
The rest of the board was covered in grout and the ditch had lots of rubbish thrown in it to give it texture. Once it was dry I could start painting and adding the wood work for the fences and bridges
basic undercoat of grey for stone and yellow ochre for wood

texture added to ground work and the start of the fences.
Although I was going to cover the whole thing in snow I still set about painting and finishing it as if I was going to leave it without snow. The only extra things I do is to highlight with a white dry brush over everything to help give the feeling of cold and frost as well as in places over exaggerate the texture so I can have stuff coming up through the snow. This sort of thing really works with the snow effect.
The paint job was just basic browns, washes and high lights. Once all that was dry I added the vegetation, again planning for it to show through the snow so using long grass and highly textured ground work.
The final effect, all ready for the snow storm has turned out OK-


You can see that I have added lots of wood in the ruined house as well as finishing off the fences. The vegetation is concentrated in front of the road and around the fencing with nothing on the roads, as they will all be mud, and the fields behind the roads as they want to be beautiful untouched snowy fields so having grass underneath would be a waste of flock.
You may also notice the heavy white dry brush on the fencing and roads. This doesn't look quite right in these photos but once the snow is on then it will just help the whole wintry effect.
There is just one week to go so the snow will go on on Monday and Tuesday leaving the rest of the week for it to dry. It needs that length of time because I really soak it with PVA glue to make sure it stays and I also mix some of the snow powder with PVA to make a thick white paste to put onto flat surfaces and I can make it droop over the side. I really like the effect it gives.
I am going to try a new product to me and that is the Deluxe shoveled snow that they say you can pile up and squash detail into it and it the detail stays (such as tank tracks) and I hope to be able to pile it up like cleared snow. We will see how it goes. Also, there is a shell hole in the road and I want to try to put a watery puddle in it with smashed ice around it. It should look good if it comes off.....
Anyway, that is it for this one. I will post more photos of the finished job and then photos of it on display at the show.
Talking about the show, if you are in London on the 3rd December then come along. It is a good day out if you are into your model soldiers. Details can be found here:
www.thetoysoldiershow.com
I am sure I met a lardie last December (it was you wasn't it Thomas?)


Sunday, 13 November 2011

Normandy Village Pt1

The week has been pretty productive for the first Normandy base. The first 24x12" base is just about populated with carcasses and they all seem to fit together OK.The first building I added (that I mentioned in the earlier post) was based on a Normandy building that the US Airborne fought over.
The original building
I liked the small extension on the side as well as the small pillar in the small alcove. I think it is a water pump.
You can see how I decided on the layout from the original photo. I wanted to add the double doors to the left of the small extension but it might be a bit tight so will have to wait and see.
The second structure was in the opposite corner from the first and was based on the following photo.
I tall 3 story building with an interesting corner. It fits beautifully into this first base-

I have put different window frames in but otherwise I have matched it pretty well. I had now got two larger buildings built so it was now a case of fitting things around them and I photo I saw of another building was just right to add to the left of this corner building.
I really like the roof line and how it finishes off a corner so I just had to use it

I am using laser cut windows and the door comes from my stock of home made resin doors. The two buildings together now make a very cosy back yard and I am starting to see the effect that I wanted with a tightly packed set of houses.
The final building has not been inspired by one photo really although the detail I am planning comes from this one-
I like the dormer windows and the shop front detail so I will be incorporating most of that into this next building.
You can't see the similarity between the photo of the real buildings and the model yet but by the end of the process some of the details will be.
I was now in a position to see if I could fit the double doors I mentioned on the first building as this last one backs onto it. You can see from this that it was impossible so it became a tight walkway into the courtyard in the middle of the base.
the overall layout
You can see there is not alot of room in the middle for the court yard so the only gap that is left will probably be filled with a gateway and maybe a small lean to shed or outhouse. If I added another house in the gap then the courtyard becomes unusable as a space.
The only gap that is left
The photo shows the space that is left and it makes sense to just add a wall and a gate. There will be 3 vehicle sized entrances to the courtyard and one walkway as well as numerous back doors so i think there will be lots of opportunities for mischief in any games this is involved in.
The next stage will see the buildings starting to be clad in whatever finish I decide such as stone.


Wednesday, 9 November 2011

November plans

It is well into November already and I have finally planned what I have to do. This is a post summarising the jobs and introducing them and then I will post with individual updates as each project progresses.
I surprised myself when I realised I have 9 jobs on the go this month! I don't have to finish them all by the end of the month but they all need to be started! Saying that, 6 do need to be finished by the end of November as the London Toy Soldier show is on at the beginning of December and they are all for then.
I will be detailing progress of 4 of these jobs. The largest is re creating a Normandy village in 28mm and that will develop over the next 15 months, ready for Salute 2013. The second is another 28mm job but for Salute 2012 and it is for Karl at Crooked Dice and I need to make a snowy mountain hide away for a James Bond type game. Staying in the same scale, the third job is building a Sudan town from a mix of scratch built, laser cut and resin models. This will go into next year I am sure as there is a alot to do. Finally, the forth job, that has to be finished for the London show is a 54mm snow scene that will be used to display various WW2 vehicles.

You will be able to follow the Normandy village development by looking out for posts headed, not surprisingly, Normandy village. The village will be built up over time with me making individual modules that can be placed on top of a cobbled area so creating streets and lanes. The first module I have just started is 24" x12" and is a series of small houses and shops that surround a courtyard. It struck me when I visited the area a couple of years ago that there are alot of gates and entries that must lead into courtyards etc so I thought this would be a good start.
a rough sketch to start with

I have found it difficult to visualise how all the buildings will fit on the board so I cut out the base board and started to sketch some ideas down. You can see the result above and at this stage I decided to build the bottom left sketch and then revisit the plan after the first house was in place. I flicked through my collection of photos I took of Normandy buildings to get some inspiration and came up with this. I cut it out of foam board and used laser cut windows


Once I cut out all the pieces and glued the windows in place and glued the whole thing together


I haven't glued the building onto the base yet as there is alot of detailing to add (this will be a stone building) but by placing it on the base I find it alot easier to see the space I have to add the next building. I hope to add a couple more building carcasses this week to the layout and finish off early next week ready for adding detail etc.

The mountain hideaway can be followed by looking out for the mountain base project header in the future. I have been given a very good preliminary sketch from Karl at Crooked Dice so you can see from it what an exciting project this will be
This will be a 4 foot square table to give you an idea of the size and will be snow covered. I have the bases ready and have had the cable car made by the laser cutter. It looks great so will post a photo of it next time. I have found the cable car a very important part of the design as I now have something to design the rest of the place in relation to the car. It sounds odd as the car plays such a small part in the overall layout but it just gives me something concrete to work from. I often find the more complicated projects need something small to kick off the rest of it.
We are currently discussing a few changes so should finalise that soon and hopefully you should see regular signs of development over the next 3 or 4 weeks.

The 54mm snow scene is a 2 ft deep by 4feet long display. There will be lots of snow and ice with the highlight being a ruined log cabin but nothing too over powering so it takes nothing away from the vehicles it is designed to display.

This is the sketch I have to follow. It should look pretty good when it is done. I can see me working on it fairly steadily for the next 2 weeks and then accelerating with it as deadline approaches!

The final project I will be keeping you up to date with is the Sudan. When this is finished it will be spectacular. The challenge I have is to blend the laser cut carcasses, the resin flat packs sets and my own scratch built buildings into a town that all belong together. The laser cut models are beautifully done but are perfect so will need some roughing up. The resin flat packs will have alot of joins where the pieces meet so will need some careful building. The scratch built stuff can be modified to fit the other building style so they should be fine.  You will be able to follow this project under Sudan village. I will give details about the resin and laser kits later.
I had better stop now and start model making as I have a busy month!