Thursday, 3 November 2011

Gandamak Diorama

The last Toy Soldier Show in June saw me get a commission to re create the last stand of the British during the first Afghan War, depicting the bloody end of their retreat at Gandamak.
I love doing these sort of jobs as it involves fixing figures in place so I can go to town on the landscaping not having to worry about where figures can stand.
The figures are from Time Machine Miniatures in 1/32nd scale (or maybe 1/35th- I am not sure). The company does a range of kits of individual soldiers and vignettes set around the British retreat from Kabul during the First Afghan War. All the work on the figures had already been done including the painting so I just had to concentrate on the landscaping and composition of the diorama.
To get me started I was given the mdf base and a booklet written by Kevin Townsend on how he made a diorama of the same scene with the same figures. This was a great source of information for me but the big difference to what I was doing was that I had a base that was wide and thin (to fit into a display cabinet) whereas the diorama Kevin made was pretty much square.
the dio in place in cabinet
As you can see from the photo I had to re create very snowy and rocky ground. It is also on a slight incline. I had to judge the incline so the figures could be set up so they were level and looked natural. If a person stands on a hill you generally don't lean forwards so if the figures did then they would look very odd.
I made the rough shape from insulation foam and then added lots of flat areas using plaster cast rocks. I then covered the foam in grout and added various stony texture and left it for a day or two to dry.
When I came back to it I painted it earthy colours as if I was going to leave it at that. I then added a bit of vegetation. I tend to put on long bits as then they can pop up through the snow and look very effective.
Once that was dry I came to the part I was least sure of how to go about it. I needed to add the snow and the figures. Should I add the snow and then the figures after the snow was dry so I could make sure I got everything stuck down properly. The problem I had with that was if I had designed the landscape wrongly (so I couldn't get all the figures on) then it would be tough to change it. also, I was having to drill into the landscape as all the figures had wire sticking out of their feet and I thought the dust from the drilling would infect the snow.
In the end I went for doing the figures as I did the snow. It meant I could press the figures into the wet snow so they looked as if they belonged. This makes the figures belong to the scene so far out weighed any other disadvantages there were doing it this way.
I really enjoy doing snowy scenes as I get alot of satisfaction from seeing the result.
The first thing I do is to finish the landscape as if you weren't going to add snow to it. It means that you don't have to worry if snow doesn't cover an area where you have left unpainted but also, the ground underneath the snow can effect the snow effect somehow- whether colour does show through I don't know but it works.
When the ground is ready, I cover the area in watered down PVA glue that includes a bit of surgical spirit in it. This reduces the surface tension of the water in the glue and allows the snow dust to soak into the glue. I apply the snow (I use Woodland scenic snow) by shaking it onto the scene just as if it snowed. It then lands on the landscape as snow would so it leaves areas clear but the piles up in other parts. Keep shaking until you are happy with the result  but I wouldn't let the snow get much thicker than a 1mm before you secure it. The original coat of glue you added will only glue the smallest amount so I then spray the scene very heavily with watered down pva glue (again with added surgical spirit). Once this has dried the snow should be stuck down properly.
You can add more snow at this stage and if you add alot more then give it another spray. At this stage you can add footprints, blood stains and any other effects you want.
While the snow was still wet I added the figures. I could push them into the wet snow so they looked as if they were walking or standing in the snow rather than on top of it- a small detail but one that is important to make it look good. That is it really.


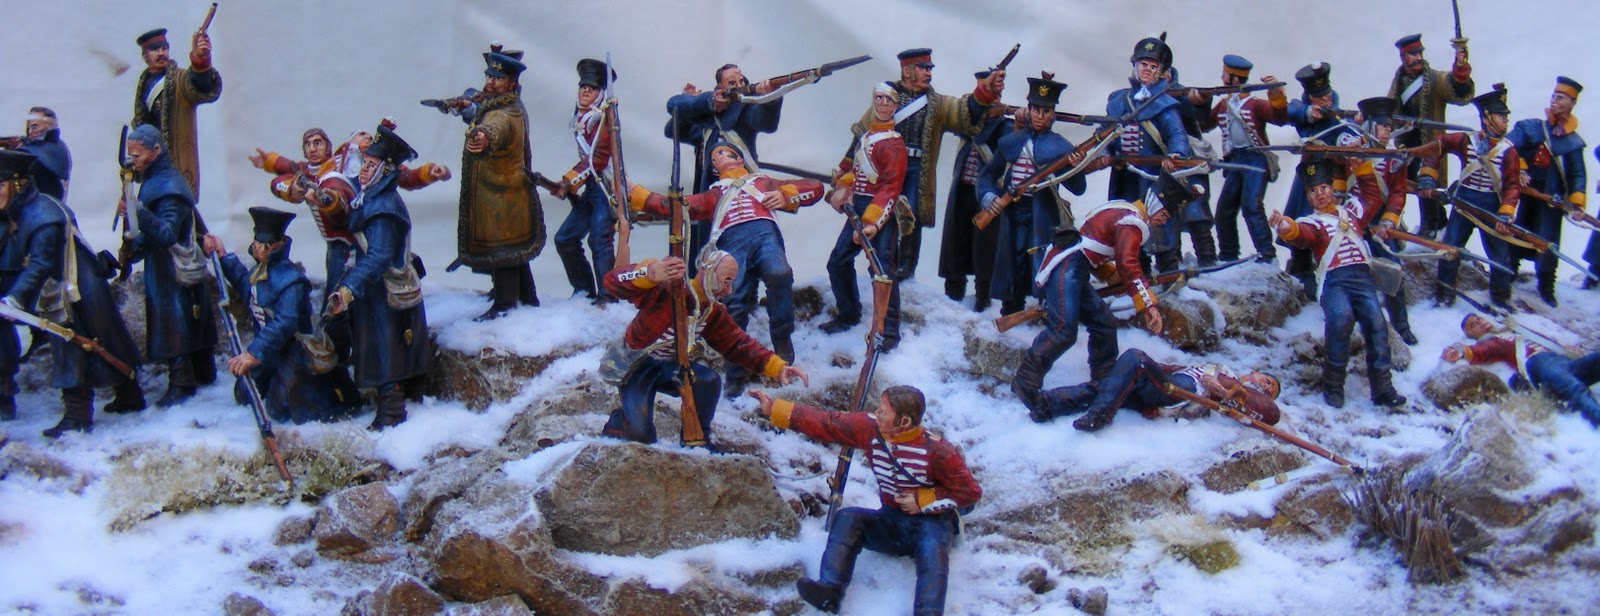
The last word goes to my customers camera when the diorama was in place......


Thursday, 27 October 2011

15mm Arnhem part 3

The next three buildings in the project are not on the same scale as the church but were just as interesting to make.
The Arnhem museum model is the third time I have made it (but the first time in 15mm) and the only source I have worked from is of the original model by Colin Rumford of Rapid Fire. The main block is hexagonal and two stories high and there are two wings coming of that to make a very odd shaped structure.
a good view of the shape.
Once I had the hexagon shape worked out, using some school boy geometry everything else came together pretty easily.

The structure was made from the usual foam board and the windows were more laser cut windows specially for this project. They are simple casement windows suitable for lots of uses so I fully expect to use the design again in the future.The museum was to be stuccoed (is that a word?) or covered in a plaster coating so I like to add a bit of depth to the walls so I stick on mounting card around the walls. I think this makes a big difference to the look of the finished building. A flat wall is not very eye catching but adding depth and 'contours' to a wall adds interest and gives you opportunities to add extra painting detail.
When everything is dry I then cover it is Quick Drying Pollyfilla (Spacal or something like that in the USA). This gives you time to work with it before it goes off but soon stiffens enough for you to be able to smooth it off or add a bit of texture.
Although it say Quick drying I do tend to leave it for half a day at least before I paint it. In this case, white. I then cover it in a wash of raw umber and then dry brush it again with white before finally adding water marks and other weathering.

finish model based.
.

the fencing is by Ratio- n gauge railway


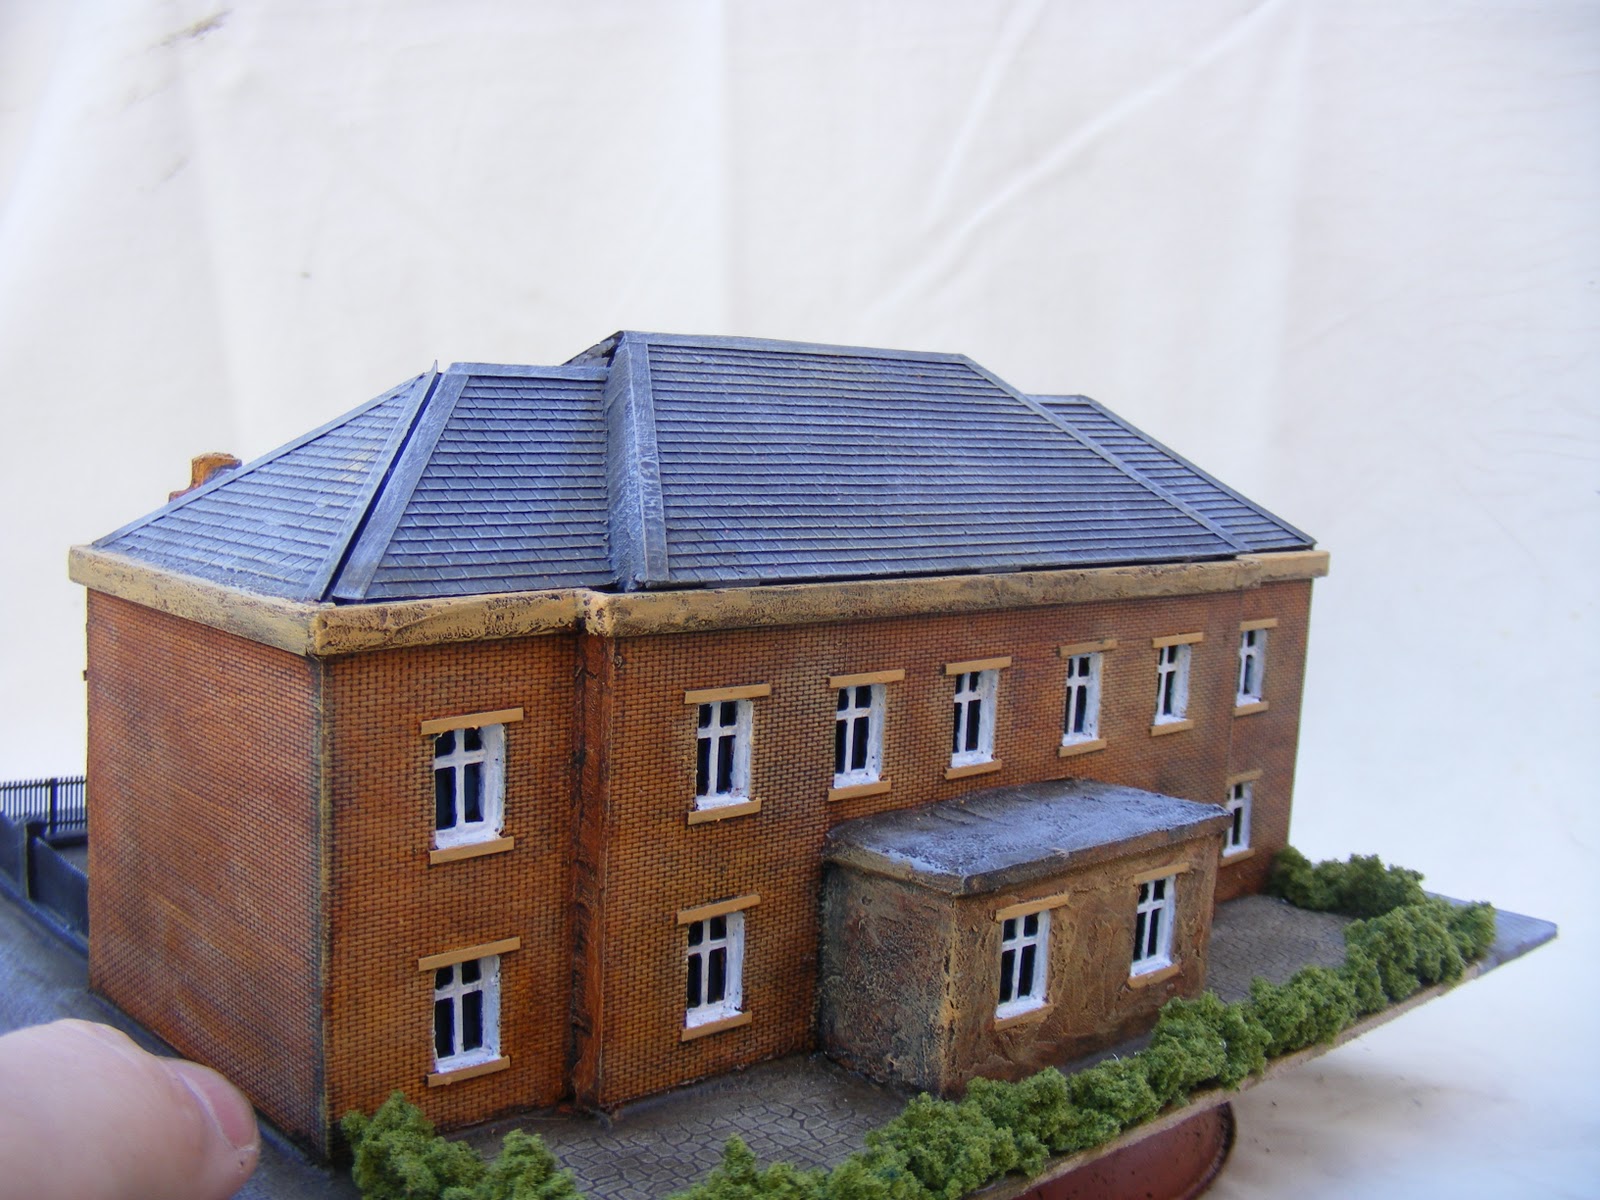
The next building was made just like the museum but is a fictitious building. It was to be on the large side for a house and similar to a photo I was given of a model my customer liked so here it is finished..

I used the same windows as in the museum.


The final building was a representation of St Elizabeth's hospital that was in Arnhem.

This was again the third time I had built this piece but the first in 15mm. The most challenging part of the build was the roof.
There are two levels to it with dormers to the front and the customers needed to get in the building so the roof had to come off. The dormer windows are attached to the front wall so I didn't want to make a join there so I designed it for just the back half of the roof to come off. I find this works well with buildings that have complicated roof lines. Gaps and spaces in the roofs very quickly spoil the look of a model so you want to minimise these when you can. It isn't a problem on a straight forward roof as the whole thing can come off but when you have dormers, corners or different heights then I think it is best to consider the half roof option.
The hospital is brick built so once I had the foam board frame and the windows cut out all I needed to do was cover it in brick embossed plasticard. There is some decorative brick work on the front of the house so I was able to just paint a lighter line of bricks on the plasticard and add a small half moon of bricks above each window. Mentioning the windows, again they are the same design as used in the museum and large house above.
the front

the rear- you can just see the join in the roof
There are now 4 buildings complete and just one to go. I am making this now so should be able to post the final episode in this project withing the next week or two.

Wednesday, 26 October 2011

15mm Arnhem Part 2

I wrote ages ago about the start of a 15mm Arnhem project. I have now pretty much finished it and I got so engrossed in it that I hardly did any in progress photography and stuff but I do have a few so here goes. I thought updating on a 15mm project in conjunction with the release, this week, of Too Fat Lardies I Ain't Been Shot Mum WW2 company level rules. I will be using 15mm figures with them so here is a 15mm project!
This project involves making 5 buildings for the Market Garden campaign. The original commission was for 4 but another has been added since. The original 4 are listed in part one of this project but the new building was used by the Germans as an observation post in Nijmegan in a place called Hunner park. It looks an interesting brick built building that I will cover in more detail another time as I have only just started it.

The other buildings are a real mix of model making challenge. The biggest challenge was St Walburgis Church.
You can see from the photo that it is a complicated building with all the roof levels and windows.
I had had the windows made so now I just designed it to fit the windows and started off with the usual sketch
my original sketch
The structure was made from 5mm thick foam board. The church was so tall that it was impractical to put figures inside it so I was able to brace the walls very well with lots of internal supports. Foam board is very strong so it soon became a very tough model.
the main hall with window added

structure complete with windows and internal support

the same stage but from the back.

Once that had dried over night I was able to clad it all in brick embossed plasticard. The only large area was at the front so the rest was lots of small bits so it took ages. Once that was done I added buttresses and other small details. I don't have any photos from now until finished so I will quickly skip over the last of the build. I added a ruined tower spire and burnt out main roof. I then painted it and tried to keep it lighter than in the photos to give it a lift and then finally based it and added a couple of small buildings around it. The church ended up being 40 cm long, 25cm wide and about 35cm high. Hopefully it will tower over the playing surface just like the real church towers over Arnhem.


I was very pleased with the windows. They were my first trip into laser cutting and they worked really well.
I will try to cover the other 3 buildings tomorrow evening.

Thursday, 20 October 2011

54mm railway station

Last year I was commissioned by Grey Goose Collectibles (www.grey-goose.co.uk) , the European distributor of Figarti's range of metal toy soldiers, to produce a diorama to display their new range of World War  Two German trains at the London Toy Soldier Show. You can imagine how big a  1/30th scale locomotive is so the display ended up being 6 feet long and about 3 feet deep- a real whopper.
Most of the photos of the diorama are taken at the London show so you will see some lights, price tickets and sales literature but look through those and enjoy the layout of the station and the trains themselves.
the quite before the storm!
Clive, at Grey Goose asked for 3 rail lines, two of which ran the whole six feet across the layout, a crane, some warehousing with sliding doors, a gantry over the railway, a platform for passengers and a road bridge across one end of it as well as lots of open space to display the figures and vehicles.
This job involved far more forward planning than I am used to. I had to make sure the trains fitted next to platforms, the buildings fitted into their area properly and really that everything worked.

The first thing I had to do was track down some railway line that was the right gauge and get a sample of the train so I knew how much space I needed to give the track. Once I had that then I could work everything else out. I used G gauge track and was lucky enough to find some 'starter' set that was just right for what I needed and didn't cost alot of money.
I am not a model railway model maker so had no idea what German railway buildings look like so I trawled the Internet and borrowed books from friends until I came up with interesting buildings- buildings that would catch the eye. The water tower, station buildings and the control building are all based on actual buildings. Everything else I made up.
The station and control building behind the Figarti loco
There is a lot of brick work with this layout- all the bridge, the water tower and parts of other buildings all were made from brick. I usually carve the brick work in this scale as I do with stone (see my earlier posts for how it is done) but this tends to be a little irregular and uneven- ideal for old and run down brick work, but this was efficient German work and I felt it had to be clean and perfect.
All that brick work!
I decide to use a new technique that I had picked up from a Dolls House fair. Using a brick stencil and brick compound. Bromley craft products (www.craft-products.com) supply a range of stencils for adding brickwork to walls. You spray one side of it with tacky glue and then lay it onto your wall. You then apply their brick mixture with a knife and pull the stencil away. Leave it to dry for a couple of hours and you have a brick wall. You keep repeating until finished. I found it gave a great result. If you got it wrong you could wipe the mixture off before it had dried and then go again.
The result was good for this job- it is big and industrial but it wouldn't work with everything so you need to pick and choose when to use it.
One of the other eye catching pieces I made was the crane. I think I got a bit carried away with it in the end but it was worth it.

the crane was big!
I looked at loads of pictures to work out a design for a believable looking crane and in the end I came up with the above. The arm mechanism was one I found in a book somewhere and I thought it looked powerful and usable. I added legs and made sure the body could move on top of the legs. That was the only thing that did move on the crane and we never tested if it could carry any weight but my guess is that it couldn't.
The whole thing was built from plasticard and strip of various shapes and sizes and then painted grey. I added a large white stripe to give contrast and lift it a bit. The rust and water marks also help to make it one of the talking points of the diorama.
The gantry was all plasticard as well.
Finally, you can see on the above picture two pillars. These, again came from the Dolls House world. Sue Cook Miniatures ( www.suecookminiatures.com) make wonderful plaster architectural details in lots of different styles. They are a great source for some amazing detailed stuff. Unfortunately the popular dolls house scale is 1/12th with 1/24th scale coming in second so alot of what she does is too big but if you pick and choose then you will find useful things. Also a fireplace in 1/12th scale makes a great doorway in 1/30th scale. In this case the pillars frame the doorway nicely and gives the eye something else to look at rather than bricks!
That is it for talk... here are the rest of the photos.....
view from the bridge

good view of the gantry.

the metal doors at the back open and close

posters from the Internet

a feel of a busy station- except for the price ticket on the vehicle!

the ballast on the track was cork chippings

a view of where I work- my attic

a birds eye view

this was the only tank I had when I was photographing at home

again, ignore it isn't German- it gives you an idea how big the building is

the wholes thing

a good view of the steps down to the platform

the sliding doors now open

the crane in action

the big clock face!

Finally, finally... this job taught me a good lesson. I work in the attic so everything has to leave via my attic hatch. I have extended it but I must remember that at least one dimension of the finished job has to be less than 2 feet otherwise I can't get it out! This is never a problem with smaller scale of work but 1/30th work is a different matter. In this case the boards were both 3ft x 3ft so the buildings couldn't be taller than 2 feet. The water tower had to be taller and the clock tower ended up being over as well. Fortunately I remembered and designed them to come off the boards. One day I will forget!