Wednesday 29 May 2013

54mm Blackrock castle

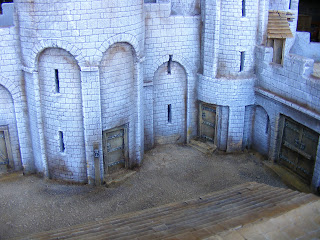
Earlier this year I completed a rather large commission for a 54mm castle. The piece was to be based on Blackrock castle in Ireland. This is a standing today but the current structure was not built as a defencive building so I had to add a few bits, such as a gatehouse to make it look more medieval.

It is an interesting structure with one large turret dominating it along with a number of smaller turrets that are dotted around the wall. It is also perched on top of a cliff overlooking water and it has  a water gate opening up into the overlooked water. I was hoping the contrast of the shiny water and the grey of the castle walls would complement each other. It all worked out in the end.

Overall, the job took about 4 months to complete and hours spent on it added up to about 250 over those 4 months. The castle was set into an oval base about 6 feet long and 3 feet wide. The castle needed to have space around it for the enemy to be displayed so overall the castle was probably 5 feet long and 2 feet wide. It was over 2 feet high at it's highest point.
It was made from mainly foam board very well reinforced along with balsa wood and some laser cut circles for the insides of the turrets to make sure they were circular.
Once I had the structure built everything was covered in air dried clay- Daz Pronto and once it was dry I carved it all to look like stone. By the end of it my fingers were a little sore!
I now had a red castle so I started painting it with a dark grey and slowly worked up to a lighter grey. I then washed it all over with raw umber and once that was dry I dry brushed the whole thing 'up' again with a series of greys and a final going over with a bit of white.
The final touches to painting the castle was to weather it down a gain a little with raw umber just highlighting areas and adding water streaks and things like that. This is one of my favourite parts of the job as it usually comes alive at this stage and the castle was no exception.
You can see the water as well in the is photo. I covered the water area in filler, covered it in PVA glue and then painted it until I was happy with the look and varnished it with gloss varnish.
The final touches were doing the rest of the landscaping, adding doors and a ramp to the main gate and that was it.
This was probably my most ambitious project ever being so big that I had to higher workspace on top of where I usually work. It wasn't just big though- there was lots of detail and the water just seemed to make the whole thing into something spectacular. I just wished I had some figures that I could have used in the photos as that is when it would really come alive. Anyway, these next photos of it finished will have to do:


That is it for this one. If anyone wants a castle building please get in touch as I loved doing this one.


Sunday 26 May 2013

Dreadball!

This is a slightly different post in that this is a project I have done for me-which is a rare think indeed!
Dreadball was bought for me for Christmas and I have thoroughly enjoyed the game. Salute saw the release, by  Amera Plastics, of a Dreadball arena. I couldn't resist so here it is.
It comes in plain white plastic so it needs to be washed and then primed in white.
I then stuck it down onto a base board that is big enough to add dice trays and card slots which was a bonus.
I have a number of teams so rather than painting it in a team colour I went for a deep blue that looks like the blue in the Dreadball logo. Two cans of car paint later it was covered.
The final touch was to have a stadium sign laser cut. Andy Slater did a great job re creating the Dreadball logo and I went for the Ortiz name as that is supposed to be the guy who invented the game.
I then painted the board and had my first game of it last week. Here are some photos of it finished.
The finished sign

Humans V Orcs in the Ortis stadium.


A close up. The sign is about 20 to 25cm long to give you an idea of the size.
In the end I went for a metallic look with the board. I think it looks OK- although I have had a couple of comments about adding some lights to it. If I have learnt only one thing as a full time model maker is that I know when it is time to stop!
Finally, I now have a Facebook page so follow the link to take a look. The plan is to use it to post regular updates on projects I am working on (probably daily), highlighting events that my terrain is involved with such as shows, any general information about TMTerrain and highlighting any useful products I come across. If I can keep to this list I hope it will be seen as a useful page to like.


Tuesday 21 May 2013

Helping the army!

This project was a new experience for me. The army contacted me to recreate a piece of training ground on a 6ft x 4ft table so they could use it in the class room before go on exercise.
I don't know what scale it ended up being as it had to fit the table so it was what it was. I had the OS maps so was able to convert the contour lines into a 3D model of the area.
This process I find a challenge as I do it all by eye. This time I had 6 boards, all 2x2ft so I was able to calculate what the shape of the ground was at all points where the boards met. I gave the carpenter, who makes my board carcasses a profile of each board side so they all fitted together.
Once I had the carcasses I filled them with insulation foam and then carved them to shape, constantly referring to the map of the area.When I was happy with the shape of the landscape I then covered it in grout and then a covering of sand to give it texture.
Once all that was dry, I needed to add the wooded areas. Although I don't know the scale of the board I do know it is very small so I used coarse grit for the woods. This worked well especially once I painted them a darker green to the rest of the board.
The natural landscape was now done so I finished it off by adding the roads, paths and power lines to the area. I just used different coloured paint for different things and it all came together pretty well.
Here are some photos:


It was great to see it finished. It would have been fun to play a 1/300th game on it with some interesting line of sight issues as it is very hilly with lots of woods.
I didn't finish it with my usual flock finish as it needs to withstand class room use so it needed to be as durable as possible.
Overall, an unusual commission that I really enjoyed doing.


Wednesday 15 May 2013

Arnhem- a post script

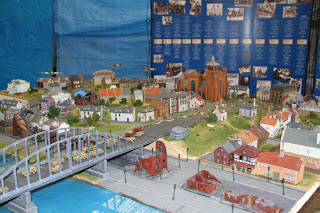
Over a year ago I was asked to make a number of buildings unique to the Arnhem campaign.
There was the hospital, museum, a church, a couple of generic buildings and a tall but narrow building that I can't remember the name of.
They were sent off and recently I received a pile of photos of them in action. I love getting things like that as I very rarely get to see them this way.
The table is very impressive and I am very pleased that some of my buildings were involved in such a large project.
Here they are:


the church was massive


an unusual shape structure- very interesting to make

This game was set up in Australia and I hope it plays as well as it looks.