The Arnhem museum model is the third time I have made it (but the first time in 15mm) and the only source I have worked from is of the original model by Colin Rumford of Rapid Fire. The main block is hexagonal and two stories high and there are two wings coming of that to make a very odd shaped structure.
 |
| a good view of the shape. |
The structure was made from the usual foam board and the windows were more laser cut windows specially for this project. They are simple casement windows suitable for lots of uses so I fully expect to use the design again in the future.The museum was to be stuccoed (is that a word?) or covered in a plaster coating so I like to add a bit of depth to the walls so I stick on mounting card around the walls. I think this makes a big difference to the look of the finished building. A flat wall is not very eye catching but adding depth and 'contours' to a wall adds interest and gives you opportunities to add extra painting detail.
When everything is dry I then cover it is Quick Drying Pollyfilla (Spacal or something like that in the USA). This gives you time to work with it before it goes off but soon stiffens enough for you to be able to smooth it off or add a bit of texture.
Although it say Quick drying I do tend to leave it for half a day at least before I paint it. In this case, white. I then cover it in a wash of raw umber and then dry brush it again with white before finally adding water marks and other weathering.
 |
| finish model based. |
.
 |
| the fencing is by Ratio- n gauge railway |
The next building was made just like the museum but is a fictitious building. It was to be on the large side for a house and similar to a photo I was given of a model my customer liked so here it is finished..
 |
| I used the same windows as in the museum. |
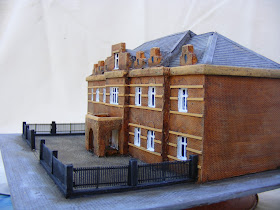
The final building was a representation of St Elizabeth's hospital that was in Arnhem.
This was again the third time I had built this piece but the first in 15mm. The most challenging part of the build was the roof.
The hospital is brick built so once I had the foam board frame and the windows cut out all I needed to do was cover it in brick embossed plasticard. There is some decorative brick work on the front of the house so I was able to just paint a lighter line of bricks on the plasticard and add a small half moon of bricks above each window. Mentioning the windows, again they are the same design as used in the museum and large house above.
 |
| the front |
 |
| the rear- you can just see the join in the roof |
There are now 4 buildings complete and just one to go. I am making this now so should be able to post the final episode in this project withing the next week or two.


cool
ReplyDeleteAlthough it say Quick drying I do tend to leave it for half a day at least before I paint it. In this case, white. I then cover it in a wash of raw umber and then dry brush it again with white before finally adding water marks and other weathering. mens necklaces usa , mens necklaces wholesale france ,
ReplyDelete