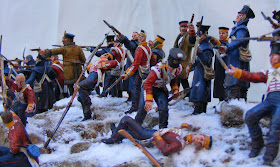
I love doing these sort of jobs as it involves fixing figures in place so I can go to town on the landscaping not having to worry about where figures can stand.
The figures are from Time Machine Miniatures in 1/32nd scale (or maybe 1/35th- I am not sure). The company does a range of kits of individual soldiers and vignettes set around the British retreat from Kabul during the First Afghan War. All the work on the figures had already been done including the painting so I just had to concentrate on the landscaping and composition of the diorama.
To get me started I was given the mdf base and a booklet written by Kevin Townsend on how he made a diorama of the same scene with the same figures. This was a great source of information for me but the big difference to what I was doing was that I had a base that was wide and thin (to fit into a display cabinet) whereas the diorama Kevin made was pretty much square.
 |
| the dio in place in cabinet |
I made the rough shape from insulation foam and then added lots of flat areas using plaster cast rocks. I then covered the foam in grout and added various stony texture and left it for a day or two to dry.
When I came back to it I painted it earthy colours as if I was going to leave it at that. I then added a bit of vegetation. I tend to put on long bits as then they can pop up through the snow and look very effective.
Once that was dry I came to the part I was least sure of how to go about it. I needed to add the snow and the figures. Should I add the snow and then the figures after the snow was dry so I could make sure I got everything stuck down properly. The problem I had with that was if I had designed the landscape wrongly (so I couldn't get all the figures on) then it would be tough to change it. also, I was having to drill into the landscape as all the figures had wire sticking out of their feet and I thought the dust from the drilling would infect the snow.
In the end I went for doing the figures as I did the snow. It meant I could press the figures into the wet snow so they looked as if they belonged. This makes the figures belong to the scene so far out weighed any other disadvantages there were doing it this way.
I really enjoy doing snowy scenes as I get alot of satisfaction from seeing the result.
The first thing I do is to finish the landscape as if you weren't going to add snow to it. It means that you don't have to worry if snow doesn't cover an area where you have left unpainted but also, the ground underneath the snow can effect the snow effect somehow- whether colour does show through I don't know but it works.
When the ground is ready, I cover the area in watered down PVA glue that includes a bit of surgical spirit in it. This reduces the surface tension of the water in the glue and allows the snow dust to soak into the glue. I apply the snow (I use Woodland scenic snow) by shaking it onto the scene just as if it snowed. It then lands on the landscape as snow would so it leaves areas clear but the piles up in other parts. Keep shaking until you are happy with the result but I wouldn't let the snow get much thicker than a 1mm before you secure it. The original coat of glue you added will only glue the smallest amount so I then spray the scene very heavily with watered down pva glue (again with added surgical spirit). Once this has dried the snow should be stuck down properly.
You can add more snow at this stage and if you add alot more then give it another spray. At this stage you can add footprints, blood stains and any other effects you want.
While the snow was still wet I added the figures. I could push them into the wet snow so they looked as if they were walking or standing in the snow rather than on top of it- a small detail but one that is important to make it look good. That is it really.
The last word goes to my customers camera when the diorama was in place......


So, if I buy two of everything for my Winter War project, I can use one to game and one in a diorama...
ReplyDeleteOr I can just realise that this is not in fact easy to do, it just looks easy because you're a bloody genius, David.