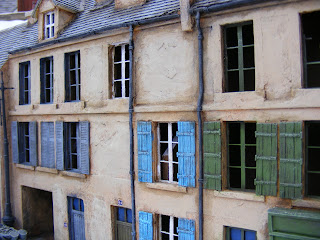
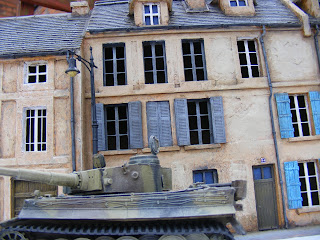
The last stage has been all painting really and adding a few little details.
I started with the usual base coat of yellow ochre and then washed with raw umber. The result at this stage is scary as it looks terrible-
 |
| Could it look worse! |
The final painting touch is to add some brown staining just to age it and add more colour variety.
Once I was happy with the paint job I added the street lights. These are plastic kits. They are 1/35th scale so over sized but somehow look right.
The very last thing was to add some telephone wire from house to house. I wanted to add them so they wouldn't be too vunerable during gaming so I made them detactable.
That is it!
Pictures tell the best story so here is a pile of them-
The first set are of the single house with the ornate front and front garden.
 |
| 28mm Tiger I there to give you an idea of size. |
This second batch is of the 'island' of houses. You can see the telephone wires, the street lights as well as a few house numbers and street names.
 |
| I used two styles of window shutter |
 |
| Different colours for the shutters add variety and colour to the street. |
 |
| Street light and telephone wires. |
 |
| The wire over the court yard is detachable so won't get damaged in play. |
 |
| Street names add detail |
This is the end of the first part of this Normandy project. Now these two pieces have been built we can now decide what to do next. I won't be adding to it for a couple of months though but when I do you will see progress here.


Wow! That is amazing stuff! I just starting to plan some 28mm Normandy terrain and this is very inspirational stuff.
ReplyDeleteThanks for the kind words. If you need any windows and shutters etc for your project then get in touch. The guy who does the laser cutting for me is looking to start selling these accessories we do together
ReplyDeleteThanks for the kind words. If you need any windows and shutters etc for your project then get in touch. The guy who does the laser cutting for me is looking to start selling these accessories we do together
ReplyDeleteImpressive work and very inspiring indeed
ReplyDeleteSuperv David, lovely variety of texture and colour. Great job sir.
ReplyDeleteI'm lost in admiration, David. That is some seriously wonderful detail. I would be interested in the window production. Any idea when?
ReplyDeletecracking ideas, love the telegraph wire idea!
ReplyDeletecheers
matt