Tuesday, 12 February 2013

Hill fort

Sorry for the long silence but I have been so busy with work that I have had to put the blog on the back burner for a while. It does mean I do have some new projects to post about over the next few weeks.

Anyway, down to business again. Last autumn I was commissioned by a customer to build an ancient hill fort based on the forts found in the UK such as a remains of a fort in Yarbury in Wiltshire
The fort was to cover a 4ft x2ft area and I was supplied with a very good sketch of just what was wanted.
You can see that there is a hill and a fort to fit in so the first challenge was to get all that to fit the space I had. I had to sketch out what I wanted on the boards and play around with it until I was happy with what I had.
Once I knew where everything was going I built up the hill with polystyrene and once the glue was dry carved it into shape. I use polystyrene as a base I will cover it in grout which dries very hard protecting the polystyrene. It means I don't have to buy the tougher but much more expensive high density blue foam.
The sides of the hill are vertical so I add plaster casts of rocks to create a cliff face.
The cliffs are about 6 inches high to give you an idea of the size.
At this stage, the fort has really taken shape but is just bare bones of a structure. I now added the wooden Palisades on top of the banks of earth. I bought long lengths of 6mm dowel and cut them to length and then cut them in half and added a point to one end. I like to cut them in half so you loose the smooth edges of the dowel.
I cut a ledge on the outside of the earth banks, added grout onto the ledge and then placed the dowel pieces onto the ledge. This gave them support and made their height regular though out the fort. I left them for 12 hours and then filled in the gaps around the dowels and then covered the whole board in grout and let the whole thing dry for at least 24 hours.


You can see I also added a bit of cat litter at the bottom of the ditches just to give some different texture than the rest of the landscape.
That is the modelling just about complete so down to painting. The earth was done with a brown emulsion washed in raw umber and then dry brushed. The wood was painted with a watered down raw umber and then dry brushed with the same cream highlight as the ground. The cliffs were painted with a dark grey and then again washed in raw umber and dry brushed in a series of lighter coats of grey until the final touches with white.
up to the brown wash

grey and washed cliff

dry brushing starting to show details.

The final stages are approaching so I now add the flock which is a base of Woodland Scenics Weed turf, followed by their green turf with a final highlight of Nochs spring grass. I soak the whole thing in watered down PVA glue to make sure it wont rub off- a messy job but very important.
Once that is dry the last touches are to add a few bushes amongst the rocks and that is it.


I was very pleased with the result and I found it fun doing something I hadn't done before. I think it would make an interesting game trying to take the fort.


Thursday, 18 October 2012

40mm Alamo - part 1

This latest project is a biggy but the deadline isn't until Salute 2013 which is in April. It feels like it is ages away but as anyone knows who arranges games for conventions the date creeps up very quickly.
Gringo 40 approached me earlier in the year to discuss this project as Ged wants to expand his 40mm ranges to include a range for the Alamo. What better place to launch a new range than at Salute along with an eye catching game showing all the figures off. That is the plan- a complete Alamo compound in 40mm scale to compliment Geds figures.
You can find out more information and keep up to date with releases by going to Gringo 40's web site- http://www.gringo40s.com.
Here is a taster of the range- the first release is a small diorama of the death of Jim Bowie-


This is the first of a number of posts covering the project. I will detail how I have done things but will keep it fairly brief as the game will be on Wargames Illustrated magazine stand at Salute and there will be a more detailed article in the magazine.

The compound has to be played over so we decided to keep it to an 8ft x 6ft display. That immediately means I had to scale the compound down a bit as if I did it in true 40mm scale (400mm to 6feet approx) then the compound would be about 15 feet long. I had a play with it and the sizes and decided to work on it in stages with stage one being the iconic chapel. It is certainly the best known image of the fight and one that needs to be prominent in the compound. I decided I would build this first and fit everything else around it.

Before I started I had a look at the King and Country 54mm Alamo chapel facade to see if I could get away with using it. The detail on it is wonderful but if it was true 54mm scale then it would be useless. Fortunately it has been shrunk so was just about perfect for me.
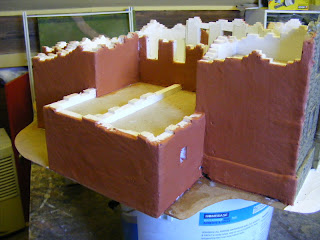
This photo is the facade straight out of the box with just a brown wash on it to bring out the detail for the photo. As you can see it is all there- it just needs a good paint job done on it. Once I had the front I built the rest from 10mm thick foam board and covered it in Daz Pronto clay.
the rear of the chapel
Once the clay was dry I marked out the stone pattern I wanted with a sharp pencil and then carved it out. This was the longest part of the job and by the time I had finished I was glad I didn't have any more to do!
you can just see the stone pattern on this photo.
While I was working on the outside I started on the inside with a ramp put in to get to the redoubt set up at the rear for some artillery. I also added some pillar details and plastered the walls. I needed to spend a bit of time on the insides as the whole thing was exposed as the building was never finished.

Once all the modelling was done all there was to do was to paint it. I used my usual palette of colours- an overall undercoat of yellow ochre ( both inside and out) washed with raw umber, dry brushed with Vallejo Dark Flesh, then again with Iraqi sand, again with a lighter buff and finally with a light dry brush of white to bring out the detail- in all 6 stages. Saying that, the very final layer was to add brown shading with raw umber- to highlight detail, add age and generally help with the weathering. The inside plasterwork was more heavily dry brushed with the lighter creams and white so it was considerably lighter than the stone work on the outside but still blended together.

The painting stages do take along time and sometimes it isn't obvious what effect some of the stages do to the model. Once it is finished then the effort is worth it.

The figures in these photos are from the Gringo 40 Mex American range so not directly from the Alamo but they were the closest I could get!
These first two show the detail on the entrance. It looks alot better in the flesh so to speak.


My favourite photo- the angle and the view into the chapel along with the light makes it difficult to work out how big it is.


Just to finish just a couple of vital statistics:
width of front 36cm (width at widest point 48cm
depth 50cm
height of facade- 22cm.

I would think there will be another 3 or 4 posts as the project grows along with a salute report and anything else that will complete the story. The next one will hopefully be before Christmas.


Tuesday, 9 October 2012

10mm Pony Wars

This post is a bit different as it doesn't have much to do with terrain. The club I belong to, the Sons of Simon Demontford, otherwise known as the Loughborough club, have been putting a participation game on this year around a few UK shows. It all started with me finding a copy of Pony Wars on my book shelf- the original 1980's Hollywood style Wild West game.
We pretty much took the rules straight out of the book, only altering the ammo rules so we didn't have to record ammo usage. Also, the original was designed for 15mm figures but we decided to go with 10mm as it recommended to get 600 Indians so it saved us a fortune going down a scale.

One of the club, Trevor did the terrain and a great job he did and the rest of us collected the figures and we were all ready to go for Salute 2012. The final show we have done was Derby this weekend so it is all over for it now.
Over the year we had a great time with it and although we never got floods of people to join in we talked to loads of guys who remembered the original and were so pleased to see it out and about again. I think it made a massive impression all those years ago when Ian Beck and his mates took it around the shows in the 80's. It has been a good year for us with this game and maybe it might encourage more older sets of rules to see the light of day again.
the overall table

Big trouble for some settlers-200 Indians will un nerve most cowboys

gun runners supplying some Indians. It could have been whisky..

I think there are a couple of cavalrymen surrounded

Even bigger trouble now

Ambush!

The magic fort where any number of reinforcements may appear during the game.
These pictures were taken at Derby and you can see the cavalry didn't have it all their own way. We got to play 4 games over the weekend and it ended up 2 each with the Indians winning once with a total massacre whereas the cavalry tended to win by the skin of their teeth.
The experience we have had with this game as a club has encouraged us to have another go next year.
I have been commissioned by Ged at Gringo 40 to make an Alamo complex in 40mm to showcase his new range of figures he is launching. Our club members will be running the game at shows. It all starts at Salute 2013 but I will be updating progress regularly here as well as articles in Wargames Illustrated. Watch this space but as a taster here is the start of the Alamo chapel...

Thursday, 27 September 2012

Pegasus bridge part 3

This project was finished for June 6th this year so I am way behind getting this last piece posted. The first two posts were going very nicely explaining how I was doing things. Unfortunately, shortly after posting part two my back went so all I was concentrating on was finishing the job in time for D day and I totally forgot to take any more WIP photos. This is the last in the series about the project and therefore is just covering the day of the re fight. York club very kindly sent me some photos of it in action. I always like getting these as I hardly ever see my work being played with so these photos are great.
This was how the whole table looked. The two bridges were scratch built along with all the boards and buildings. The trees were supplied by the Model Tree shop (http://themodeltreeshop.co.uk/). They have a massive selection of trees to cover most budgets.
Here is a good view of Pegasus bridge. I used a mix of plasticard, laser cut mdf and plastic strip for the bridge. I had to make it shorter than the real thing as we were very short of space so compromises had to be made.
This is the whole bridge. The original bridge is a lift bridge. The model didn't move! You can just see Cafe Gondaree on the right of the photo.
This is a better shot of it on the banks of the canal. The roof comes off and the windows are laser cut so you can get figures in the windows and work out line of site etc.
The other bridge on the layout was over the river. Both bridges were taken by the paras on the night of 6th June and were vital for the success of the invasion. The model's detail is all laser cut- the lattice work below the road way and the railings are all laser cut. I am finding laser cutting to be indispensable.

The game didn't just revolve around the bridges. This is the ground between the bridges. The game had this area alot smaller than the real space but again gaming limits dictated what we could do.
Of course the game wouldn't be complete without lots of British paras..


The gliders are resin from Grand Manner. I don't know whose the para figures are.
That is it for this one. A nice quick one to finish off the month.