Wednesday, 19 September 2012

Boothill in 28mm

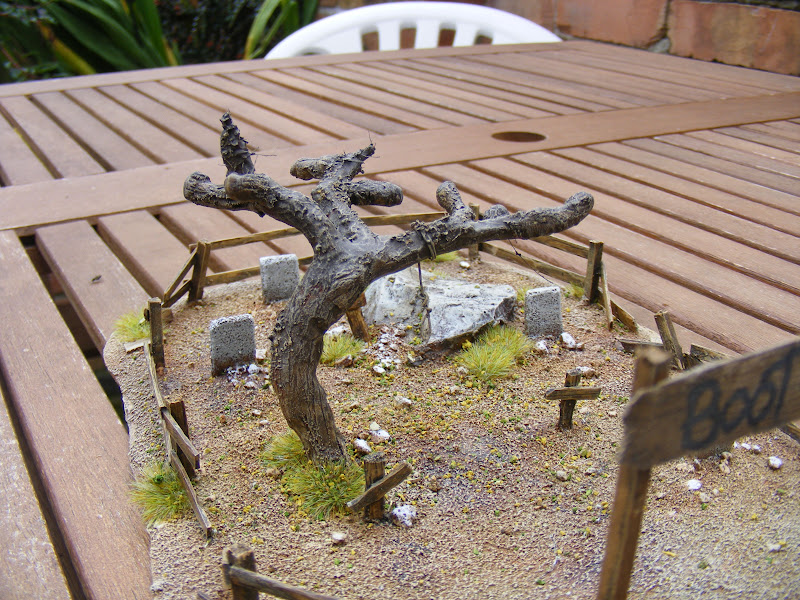
I thought I would highlight something a little smaller than normal this time. I have recently been asked to make a small base- about 20cm x 17cm depicting Boot hill.
I really enjoyed this one as the specification I was given was pretty tight so I just had to concentrate on making it and I had to make a tree that I don't do very often (simple things give me alot of satisfaction!).
The base consisted of a broken down fence around the edge with a  hanging tree, rocky outcrop and head stones inside the cemetery. The headstones wanted to be a mix of stone and wood. I had some spare Dolls House floor tiles made from real stone so broke them down to a suitable size and shape and they turned into good looking stone head stones.
The tree had to be scratch built. Normally I would buy trees as I can't make them quick enough to make it worth while and the quality of off the peg trees are very good. This tree needed to be old and gnarly with a branch for the rope. I made a wire skeleton and then covered it with daz pronto (air dried clay). Once that was dry I added more clay, filling in gaps and adding more detail. I also scraped in bark detail into the wet clay with a scalpel. I left some wire exposed at the base to spread out and use as a firm base to glue it in place.
Once in place I painted the trunk and then added the foliage using rubberised horse hair (I buy this in large sheets from upholsterers as it is much cheaper this way than buying small amounts from model shops) which is then sprayed with watered down PVA glue and sprinkled with home made flock. I use cork chippings that are dyed various shades of green, brown and yellow.

The rock is from a Woodland Scenics rock mold. I use these alot and I love the results. They do lots of different patterns. I have 4 or 5 of them and they all get regular use.
The wooden fence was just painted plasti card cut to size as was the wooden headstones. The texture on the base was just sand painted.
When I sent the customer a photo of the finished job he said he had wanted the tree dead so I had to take the foliage off. I also had to model a few more branches onto it. Fortunately it all went well.


That is it. A very quick one this time!

Thursday, 13 September 2012

Normandy Village part 8

I have just looked at part 7 and noticed that I signed that off with a promise of another post by the end of September when I had finished the base. It is now the middle of September and I finished it 4 days ago so it has taken me abit longer than expected.
I must admit that I concentrated fully on finishing the base rather than taking photos so I don't have any more that explains what I was doing. The following photos are of the finished base and then to finish there are a few from the customer with figures in place as well as surrounded by other terrain.

Here is the whole thing finished-
You can see the town hall type building on the right with a fancy timber framed building along the bottom that will be a hotel backing onto a number of small town houses. The corner timber framed building finishes off the base. This is the same style of another building in the countryside so helps to tie the whole table together.
All the buildings are surrounded by pavement so the base can be placed anywhere on the town board creating roads where ever you want them.
The large timber framed piece was a very complicated piece, especially the roof so I ended up tiling it with individual tiles instead of using the sheets of resin tiles that I normally use.

The town hall could have ended up as a big ugly building but I was pleased how it ended up in the end- just enough windows, the balcony works and the coat of arms added a splash of colour (the coat of arms is completely made up from Games Workshop transfers I found in my painting table!)

The row of town houses were an interesting mix of houses. I varied the height, roof style, colour of walls, shutters and distance from the road making a potentially dull row of houses into something alot more eye catching.
The guttering you can see all comes from Skytrex Models. The windows are my own laser cut supply and the shutters are also my own metal ones that I had loads made of years ago. I also added wire running along the outside of the houses going into a box on the front of each house. The boxes were from my spare box of plastic kits so I have no idea what they should have been but they look good as boxes on the side of houses!
The lampposts are plastic kits from Miniart. They are 1/35th scale but fit perfectly with the house models. They are beautiful designs and very eye catching.
The whole base had a back yard. The original idea was that it would be bigger than it has ended up being. It is no long and thin, probably wide enough for a small armoured car but nothing more.

That is it for my photos but I have saved the best to last. These next 6 photos are from my customer. He has added figures as well as putting this new base next to the other two bases I have done earlier for him (have a look at earlier in this series for more details) and some landscape. The vehicles have been painted by the Troop of Shrew and the figures are done by Artmaster. You can see that the finished game will look spectacular so look out for it at Salute next year.


That is it for now on this project. The plan is to do one more base that will go at the end of the town and the idea is that it will blend the town into the countryside. That will be done next year before Salute and will finish the whole thing off perfectly.




Thursday, 6 September 2012

Toy Soldier displays part 3

The second ACW diorama I talked about yesterday is more involved with lots more going on. This diorama has a river being crossed by charging Confederate infantry being supported across a stone bridge by some cavalry. The Union infantry are gallantly trying to counter charge across the river while defending a fence line against the marauding cavalry.
The board is 18mm thick mdf and is 60cm long and 30cm deep so I ended up squeezing alot on a small space. I think it made it more entertaining to look at and maybe more lifelike?
The stone bridge was made from Daz Pronto coated foam board which when dry is carved with the stone pattern. There wasn't enough room to have the whole bridge so I designed it to disappear off the edge of the board leaving it up to my customers imagination as to what was still to come up the road.
The fencing I have cast- the wooden split poles are metal and look pretty effective as split logs. The piles of stone is just gravel I picked up on my travels- probably by the side of the road somewhere!

I consider the most eye catching piece of the layout is the water. I didn't want to make it smooth as there are loads of men running through it so I had to make it churned up with splashes etc around the figures.
I think I got the effect I was looking for and I thought the spinning rifle half out of the water was a good touch.I remember I didn't make the river very deep so to give the effect of depth I had to cut some of the legs down on the figures- always a nervy time- The Confederate standard bearer looks like he is standing in about2 feet of water (about 2 cm in scale) but the model is really in about 5mm of depth.


There is not alot more to say so here are a few more photos of it


That is it for now with this series of dioramas with the figures built in.


Wednesday, 5 September 2012

Toy Soldier displays part 2

This is a follow up to the post last week concentrating on displays I had done using W Britains figures. This post is about a similar process but using Collectors Showcase American Civil War figures. Both these displays that I cover here are for the same customer. They are both the same sort of size- 60cm long and 30cm wide. The figures are about 60mm tall so it gives you an idea what is involved.

These were both great to make as all the figures are in position so I can do as much texturing of the groundwork without worrying about where a figure will stand. I did this one about a year before the next one so I learnt a few things and I think it shows.
This layout has the Confederate High command overlooking a charge down the hill into a Union skirmish line full of Sharpshooters and Zourves.
There is a ruined cannon in the scene but rather than wasting a good Collectors showcase metal piece I found a cheap plastic model, painted it and knocked it around abit and it worked fine.
I used various flocks and underbrush effects. I have a static flock applicator that makes the long flock pieces stick up just like grass so gives very good effects- ideal for these sort of layouts. It was an expensive piece of kit but worth it if you are doing alot of that sort of thing.

The figures are all from the Collectors Showcase range of ACW figures. I did this diorama quite a while ago now so all the figures have sold out but I used them straight out of the box with no modifications or repainting. I hope I displayed them to tell a good story.


The rocks are plaster casts from the Woodland Scenic range of rock molds. I use them all the time.

Looking at the number of photos I have included of the first dio, I will leave this post as it is and do another to cover the second layout I mentioned earlier. I will try to post that one tomorrow.